IMPORTING AN X3 FROM CHINA
Here's a random collection of pics I appreciate that there's almost no detail here.E-Mail me if you'd like to know more.
I've had a little HAFCO MY-T mill on and off (it sort of got handed around) for
a few years.
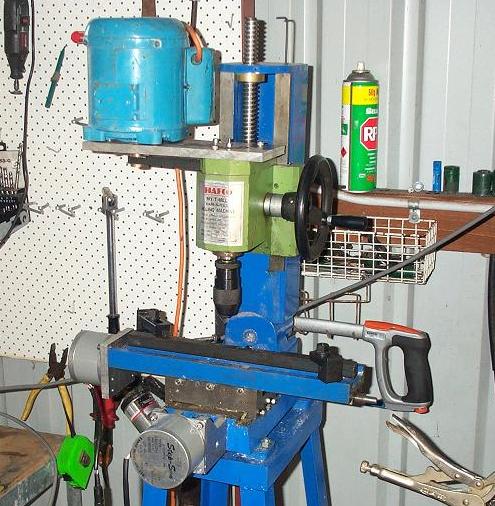
It was actually the first machine I tried to convert to CNC control. Let's
just say that I learned a LOT from it.
With the advent of the new shed, it was time to look at a more significant
milling machine.
The pro's and cons were weighed up, and it came down to an X3 or an HM45. At
that time I was a bit more convinced that I was going to end up CNCing whatever
I bought so that swung me towards the X3 on the grounds that the 3/4" ballscrews
that I'd need for the HM-45 would swamp the cost of the machine.
This was a mistake.... I'll talk more about this after some pics.
About this time, Russell (not called Dave because he's Austrian.. Austrians
being the good flavour of Germans) started talking about a group import of X3's
direct from Seig in China. He got some quotes and the economics where hard to
argue with, All up, shipped, delivered, landed, taxed tarriffed etc. we paid
about AU$1100 for the machine, a saving of about $500. The real bargain
though were the accessories, $250 for a 4" rotary table and tailstock. Silly
cheap dollars for a tilting table and quick vice. The bottom line was we got an
X3, rotary table+tailstock, tilting table and quick vice for about what we'd
have paid for the X3 on its own.
Seig were excellent to deal with. On day one they told us how it was going to
work and they met every deadline. I have a friend (Dave) who is starting to buy
a lot of electrical components from China, he has nothing but good things to say
about the service he gets..
The shipping costs were a real eye opener: 5 mills+acessories (see pictures
below for an idea of the volume) but something like a metric ton of metal,
Shipped from the factory, loaded onto a ship. Carried to Singapore, moved to
another ship, then carried to a local port in Australia for US$250. That isn't a
typo, US$250 to ship about a ton halfway around the world! The frustrating bit
was it cost twice that to get it off the local dock and onto our trailer!
No wonder the world is full of Chinese exports..
Anyhow, eventually we did get them onto the trailer:
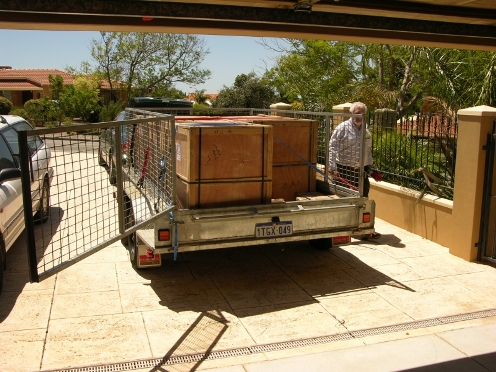
And so began the task of delivering them to their homes.
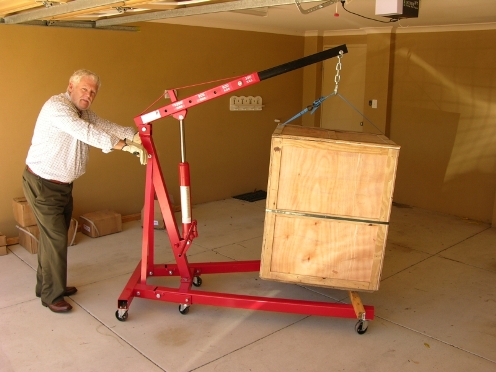
bet you didn't know Santa was Austrian!
We did about 200Km and 3/4 of a tank of petrol in a day, oh and we manhandled 5
milling machines (thanks to Rod for the loan of the engine hoist!). I slept well
that night.
At this point I hadn't got the new bench ready for the mill, so it sat in it's
crate for a few weeks before I opened her up.
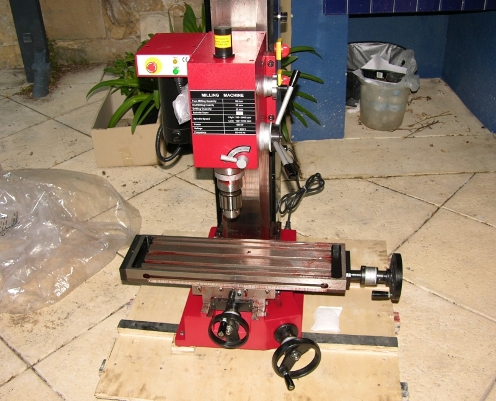
All the machines survived the trip, although the crates showed signs of just how
badly warfies can handle your freight.
The trick to moving machinery around is to:
- a). Take your time. Mistakes and injuries happen quickly. If you are making sure that everything can only move slowly then you're off to a good start.
- b).Use the right equipment. Yes, an X3 can be grunted up onto a bench with two or three blokes. But this violates point a. Use an engine hoist... or jacks and trolley.
- c).NEVER get under anything that isn't resting on blocks. DO NOT trust a sling or hydraulic jack. Learning this the hard way is a poor option if it kills you.
Applying all three of these principles I constructed a ramp and some rails to run the engine hoist on and got her onto the bench.
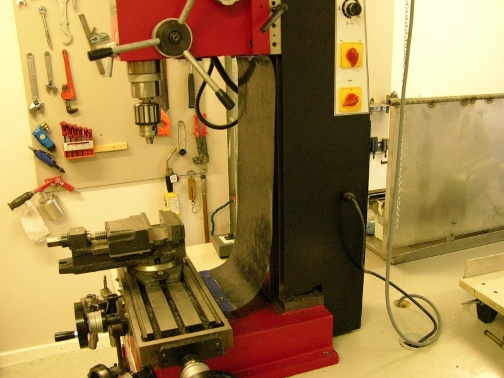
At this point the only modification made has been the fitting of a rubber swarf shield. Take note of how solid the machines column looks. It's part of the great deception that is the X3..
And time passed by
Haven't updated this page for ages.OK. The X3 and super X3 are crap. don't buy one. The HM45 costs about the same and you get about 3 times the iron.
Crap thing about the X3 #1: The motor
The X3 has a DC motor with one of those rubbish SCR/MOSFET controllers that the little Chinese machines have become infamous for.Under load you can see the voltage spike inducing sparks leaping from the brushes to the commutator. Mine lasted a week...
"Boo hoo, my Chinese machine needs a motor upgrade." I hear you say. And you're right. It's the sort of thing you expect to have to do to a cheap machine and I didn't have a problem with it...
I picked up a 2HP 2 pole motor attached to a multi stage pump for $100 at the local markets:
It looked a lot like this one:

I kept the motor and sold the pump for $350.. not a bad deal!
I then coughed up top $ for a flux vector VFD (more info on these things here ) from Drives Warehouse . Best prices and service I know of.
Now you might be thinking that 2HP is a bit too much power for a little machine like an X3. And you'd be right. What I was trying to achieve is torque at low speeds without that bloody gearbox screaming at me!
Even the best drives loose torque when you slow right down, so having an excess meant I'd still have a bit left at the sorts of speeds I was looking for (around 50RPM).
I have the drive set up to limit mechanical power (by controlling current as a function of RPM) to 1HP.
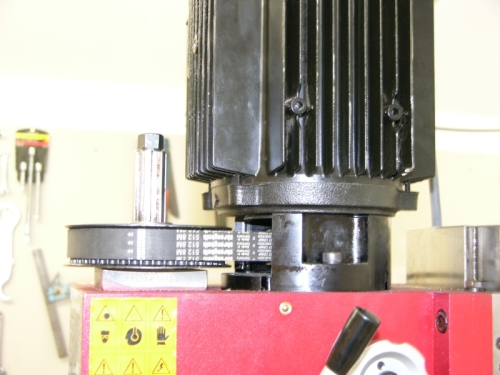
That black adapter is a big chunk of Aluminium I machined up and anodised..
To get the power to the spindle I used a toothed timing belt
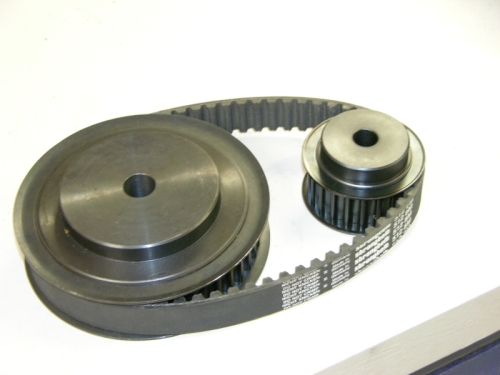
The 2:1 ratio gave me a 3000RPM top speed (over driving the motor to 6000PRM with the VFD) and even more torque down low. But, if I was doing it again, I'd use a poly-V belt. The timing belt is fine up to about 1000-1500RPM, after that, it really starts to make more noise than I'm happy with. Still, it doesn't slip and I can power tap M12 into steel with this thing!
The Hitachi VFD has a removable panel that you can connect back to the drive with a CAT-5 networking cable. Easy!!! I made a bracket and added a switch box.
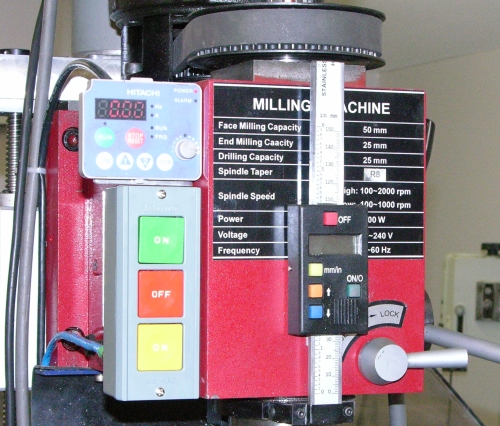
The red and green buttons do as you'd expect. The yellow button decelerates the spindle to a stop and then reverses it. I use it for power tapping.
Now the super X3 owners out there will be saying "My machine can do that" and it sort of can. But the minimum speed for the SX3 drive is 100RPM. My setup is unstoppable at 15RPM!.
Take a look
Oh and the rated drilling capacity of an X3 is 25mm. Try it on yours. I dare ya!
You'd need a 24.5mm pilot hole.
With a 15mm pilot hole, I can now (only just) drill 25mm with this setup. See:
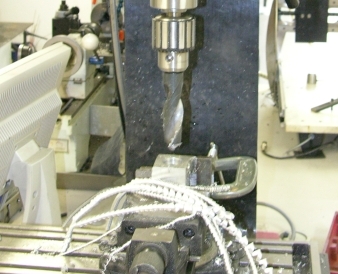
And now for the BAD news
Crap thing about the X3 #2: The Column
OK, so the motor is sorted, and it's a pearler. I start using the machine and really struggle to get it to take a decent cut.A 3mm x 3mm cut with a 12mm slot drill has the machine vibrating all over the place and I'm getting a terrible surface finish.
It's a long story, but it ends with me cranking the head up to the top of the column and pulling left to right with a spring balance on the spindle nose. Would you believe 0.5mm flex in the column with 10Kg of force!
I struggled with this and spent many hours trying to find the thing that was loose or the missing bolt.
In the end I measured the deflection at various points of the column itself, did some high school trigonometry and figured out that it was ALL column flex! I reality checked this against every other mill I could find, from an X2 to a big Russian thing, scaled them all by size and mass so I was comapring apples with apples and concluded that the X3 was 10 times worse than anything else I could find! Further evidence lay in the observation that I could take about twice as big a cut when the cutting forces were directed forward or backward (ie trying to bend to the column) as when the cut was trying to twist the column. What gives?
In the picture above, the column of the X3 looks pretty beefy, here's what it looks like with that black sheet metal removed:
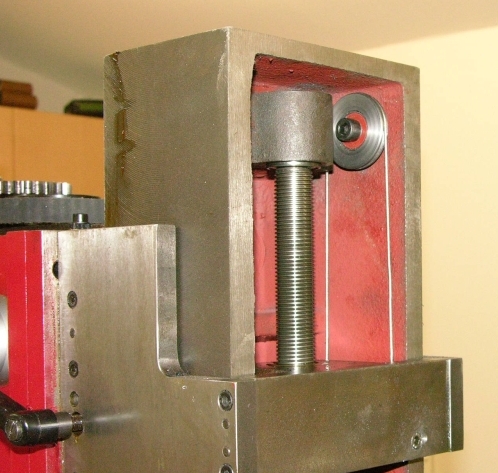
Oh, and you can see the setup I used for a counter weight for the head. DONT GET ME STARTED ON THE HEAD LIFT SETUP ON THE X3!!
The problem is that the X3 column is an open backed channel, it's not even a big open backed channel, just 140mm wide by 100mm deep.. Much like a length of guttering. An open backed channel just isn't anywhere near as torsionally rigid as a box section which is what just about every other mill on earth uses.
Turns out there's a bit of a thread on the problem here on CNCZONE .
The real problem is that you can't just bolt a plate on the back to turn the channel into a box because of the way the head is lifted. First up you have to remove the whole Z axis screw and come up with another way of lifting the head.
Actually this isn't a bad thing. The Z axis lift mechianism moves the head 1mm for each turn of the handle (the othe axii move 2mm per turn), so you're cranking for ages to move the sucker. The whole mechansm is so draggy (lot of bush bearings and cheap gears) that it's a real workout to shift that head. Interestingly, when I came to dissasemble it, I first disconnected the lifting yoke from the head. Even without the head attached, it was still hard to turn!
Here's how I lifted the head
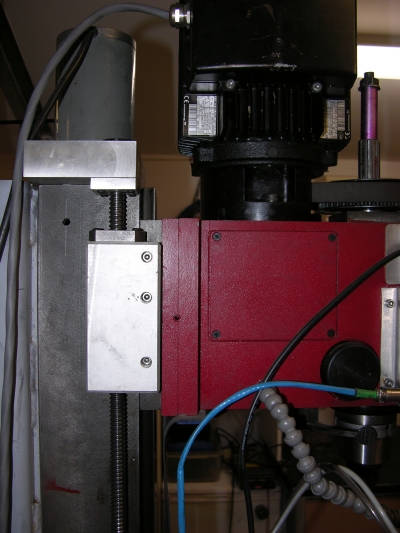
I figured, since I had vague intentions of CNC-ing the machine at some point, I might as well just do the Z axis up front.
At first (and I used it this way for almost a year) I just wired a switch up to move the head up and down.
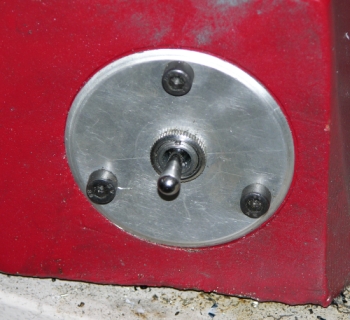
If you've ever cranked an X3 head up by hand, you'll be getting excited about now!
That out of the way, you go get a bit of steel to bolt across the back. Now I started thinking I'd just use a bit of 1/2" plate..... and ended measuring the free space on the bench behind the mill and buying the biggest bit of steel that would fit:
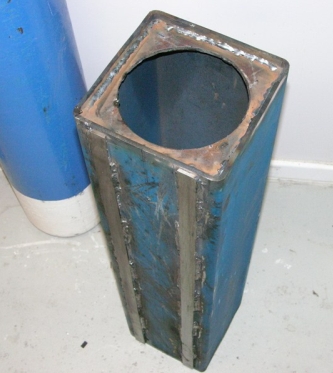
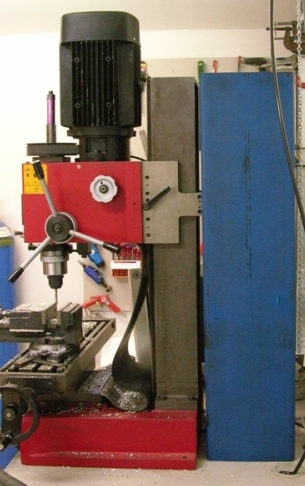
The shot on the right gives a good indication of how small the OEM column is.
You can see that I installed bracing into the ends of the 200x200x6 SHS and welded strips down one face. These strips mate with the surfaces on the back of the mill and were planed flat on Daves little shaper
We pulled the machine down and John (he likes to be different) helped drill and tap the holes in the back with a jig I made
We had to hand scrape the base back a little as there is draw on the casting (it flares out). This turned out to be an easy thing to do as the iron was soft.
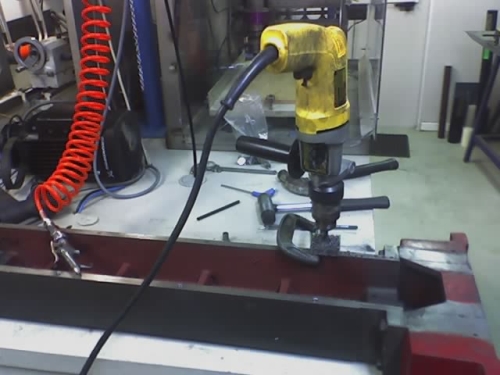
A quick coat of paint and she was done!
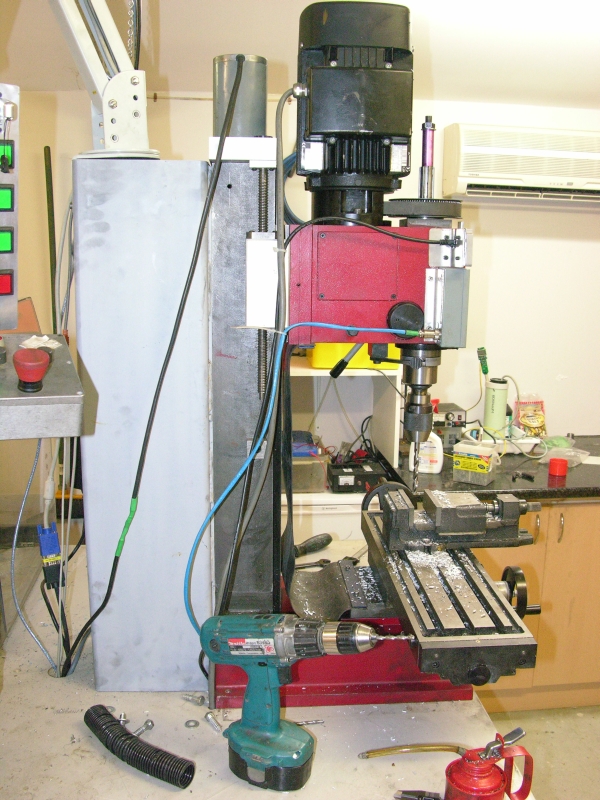
You can see how I lift the head in this shot too. I had to drive the screw with a 1:1 timing belt so that the stepper didn't foul the motor. It was either that or move the screw back towards the rear of the column and I was concerned about the moment that would apply to the head..
The verdict
Deflection with 10Kg of force..... about 0.01mm or less than half a thou! More importantly, when I take a stupid cut (like 10mm full width with a 12mm slot drill, it just deflects rather than vibrates. This mod, drastic as it is, lowered the resonant frequency of the machine... Adding mass to the head would do the same. I may do it..I can now take a 5mmx5mm cut with 1 12mm slot drill, in any direction without drama. I can plunge a 16mm two flute, indexed tipped endmill into steel at 1500 RPM wthout catastrophe. In short, I'm very happy with the machine.
But don't buy one!
Buy an HM45 and avoid all this work!
But wait, there's more
So the years passed and I've been using the machine quite a lot. One day the coupling on the X axis let go, to recap: After a fair bit of (ab)use, the X axis ballscrew was just flogged out which meant tool snapping backlash. On top of that, the way I had arranged the ballscrew was stupid in most respects... This pic shows that it looked really neat!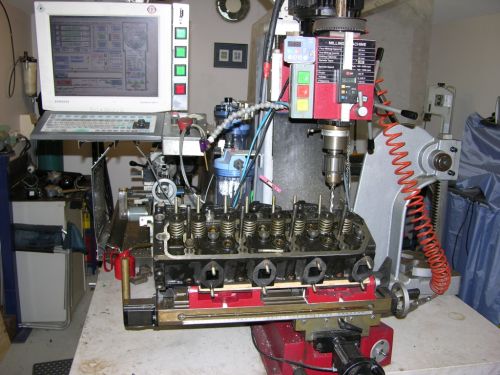
The coupling between the stepper and the screw was under the table and the preloaded bearing was at the other end. This gives a neat looking install with minimum stick out, but means you have to align 3 axii (bearing, ballscrew nut, and stepper motor) in two dimensions, and the thing you really need to move to do this (the ballscrew nut mount) is unreachable when it's assembled. The result was a bout 2mm of deflection at the motor end of the screw as the table moved to the left. Eventually, this took it's toll on the coupling which failed. So this time I went for 'clunky but simple':
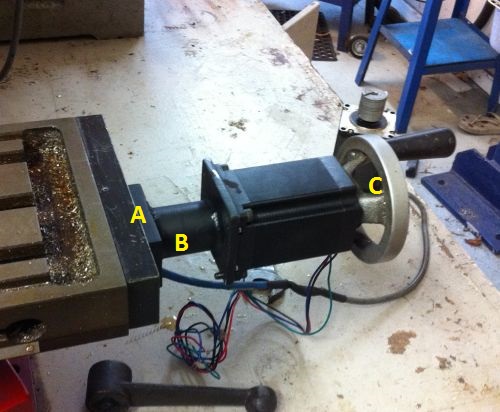
A is the cover plate that clamps the double row angular contact bearing, the coupling is inside B and the dual shaft motor allows a hand wheel at C.. In the background you can see the old motor with the broken coupling. The good things about this arrangement are: You can leave the other end of the screw unsupported. You only have to align one part the plate on the end of the table. Took me about 5 minutes to dial it in.... Just got to wire it up now and we'll be back to making swarf. homepage